


In the world of cinema and video production, correct exposure is of vital importance. Exposure assessment by eye can be misleading, especially in scenes where log shooting is used. In such cases, one of the tools most commonly used by professionals is the False Color feature.
False Color is a visual analysis tool that encodes luma (brightness) data from the camera’s sensor with different colors. This allows you to quickly and directly understand how much light each area of the scene is receiving, which tones are overexposed, or which are lost in shadow. This indicator also enables us to achieve perfect accuracy in green screen shots.
False Color imaging systems color-code brightness values between 0 IRE and 100+ IRE to correspond to specific color scales:
• 0 IRE: Magenta or black – Completely dark areas with a high probability of detail loss. There is no image data here.
• 1–12 IRE: Dark blue – “Magenta under” warning; data is present but very dark.
• 12–22 IRE: Light blue – Indicates less darkly exposed areas.
• 23–42 IRE: Brown – Shadow details.
• 43–55 IRE: Green – Midtones. Especially 45 IRE is a reference for gray card exposure.
• 56–58 IRE: Pink – Ideal for skin tones. Exposure should be done in this range.
• 59–78 IRE: Gray tones – Slightly above midtones.
• 70–80 IRE: Yellow/orange – Bright areas. Used for correct exposure of white objects. This range is considered the upper exposure limit.
• 90–100+ IRE: Red, pink, or white – Overexposure (clipping); details are lost and cannot be recovered.
Note: These colors may vary depending on the manufacturer. Manufacturers such as ARRI, RED, or Blackmagic may adapt the False Color scale according to their own technical charts. Therefore, understanding the False Color map of the camera or monitor being used is critical for efficient use.
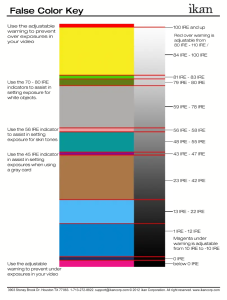
Figure 1: Graph showing false color ranges.
Practical Example:
If you are shooting an interview scene and want to make sure that the person’s face is correctly exposed, it is ideal for the face to appear pink or green in False Color mode. However, if the window behind the same scene appears completely red, there is a light flare, and this area may have suffered detail loss that cannot be recovered in post-production.
The sensor structure and ISO behavior of cameras also directly affect the use of False Color. For example, a Dual Native ISO sensor can offer different dynamic ranges at different ISO levels. Therefore, cross-checking the exposure not only with the histogram or zebra stripes but also with False Color is crucial, especially for the VFX or color grading process.
Using False Color in Green Screen Lighting
One of the most critical areas for False Color usage is green screen (green backdrop) shots. As is well known, even lighting is very important in these shots. Unwanted tone transitions can cause serious problems in the color key process and prolong the post-production process.
With false color lighting control, we can achieve near-perfect lighting balance because we can clearly see the tone ranges.
Visual Examples:
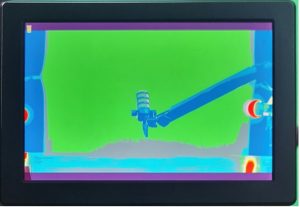
• Image 2: Green screen with nearly perfect, even lighting. Easy post-production process.
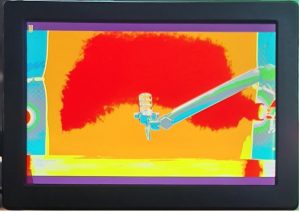
• Image 3: Partially evenly lit but overexposed green screen. Impossible to salvage.
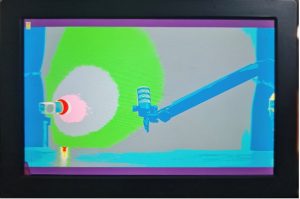
• Image 4: Although close to correct exposure, the green screen is unevenly lit. It is impossible to salvage.
Conclusion
False Color is not just an exposure aid; it is a technical analysis layer that directly shows which area of the scene is in which exposure range. It provides a significant advantage in the field and in post-production for cinematographers, DIT (Digital Imaging Technician) specialists, and color grading teams. When used correctly, it not only enhances the aesthetic quality of the scene but also significantly simplifies the post-production process.
Especially in projects involving log shooting, green screen use, wide dynamic range targeting, or skin tone sensitivity, the use of False Color is almost indispensable for achieving optimal results.
Süheyl Günaydın
Production